5. PieSwitch Online
5.1 เปิดไฟล์ PieSwitch_Online.ino บนโปรแกรม Arduino IDE
/*  NETPIE ESP8266                                         */
/*  More information visit : https://netpie.io             */

#include "config.h"            // เรียกใช้งาน config appid, key, secret, wifi_ssid และ wifi_password
#include "PieRelay.h"        // เรียกใช้งานไลบรารี่สำหรับควบคุม Relay
#include <ESP8266WiFi.h>    // เรียกใช้งานไลบรารี่สำหรับ esp8266
#include <MicroGear.h>    // เรียกใช้งานไลบรารี่สำหรับเชื่อมต่อ NETPIE

#define RELAYPIN1  13
#define RELAYPIN2  12
#define BUTTONPIN1 2
#define BUTTONPIN2 0

const char* ssid     = WIFI_SSID;        // กำหนด wifi ssid ในไฟล์ config.h
const char* password = WIFI_PASSWORD;     // กำหนด wifi password ในไฟล์ config.h

WiFiClient client;                    // ประกาศ object wificlient
MicroGear microgear(client);            // ประกาศ object microgear library

PieRelay *sw1, *sw2;
bool toPublishSW1State, toPublishSW2State;    // กำหนดตัวแปรเก็บสถานะการส่งข้อมูลผ่าน NETPIE

void stateChange(int relayID, int type, int state) {
  Serial.print("relay "); Serial.print(relayID); Serial.print(" --> "); Serial.println(state?"ON":"OFF");
  // กำหนดสถานะสำหรับส่งข้อมูล เมื่อมีการอัพเดทสถานะ Relay หรือมีการกดปุ่มสวิตซ์
  if (relayID==1) toPublishSW1State = true;
  if (relayID==2) toPublishSW2State = true;
}

void onMsghandler(char *topic, uint8_t* msg, unsigned int msglen) {
  char m = *(char *)msg;
  msg[msglen] = '\0';
  Serial.print("incoming message: "); Serial.print((char *)topic); Serial.print(" --> "); Serial.println((char*)msg);

  // ตรวจสอบสถานะคำสั่งเปิดปิดสวิตซ์
  // 11 (เปิด), 10 (ปิด), 1? (ตรวจสอบสถานะ) เป็นคำสั่งสำหรับสวิตซ์ตัวที่ 1
  // 21 (เปิด), 20 (ปิด), 2? (ตรวจสอบสถานะ) เป็นคำสั่งสำหรับสวิตซ์ตัวที่ 2
  if (msg[0]=='1' && msg[1]=='0') sw1->setState(0);
  if (msg[0]=='1' && msg[1]=='1') sw1->setState(1);
  if (msg[0]=='2' && msg[1]=='0') sw2->setState(0);
  if (msg[0]=='2' && msg[1]=='1') sw2->setState(1);

  if (msg[0]=='1' && msg[1]=='?') toPublishSW1State = true;
  if (msg[0]=='2' && msg[1]=='?') toPublishSW2State = true;
}

void onConnected(char *attribute, uint8_t* msg, unsigned int msglen) {
    Serial.println("Connected to NETPIE...");
    microgear.setAlias(ALIAS);
    toPublishSW1State = true;
    toPublishSW2State = true;
}

/* Initial WIFI, this is just a basic method to configure WIFI on ESP8266.                       */
/* You may want to use other method that is more complicated, but provide better user experience */
void initWiFi(){
    if (WiFi.begin(ssid, password)) {
        while (WiFi.status() != WL_CONNECTED) {
            delay(500);
            Serial.print(".");
        }
    }
    Serial.println("WiFi connected");
    Serial.println("IP address: ");
    Serial.println(WiFi.localIP());
}

void setup() {
  Serial.begin(115200);

  sw1 = new PieRelay(1, RELAYPIN1, BUTTONPIN1);
  sw2 = new PieRelay(2, RELAYPIN2, BUTTONPIN2);

  sw1->setCallback(STATECHANGE, stateChange);
  sw2->setCallback(STATECHANGE, stateChange);

  initWiFi();                // setup และเชื่อมต่อ WiFi

  microgear.on(MESSAGE,onMsghandler);        // ฟังก์ชั่นนี้เป็น event รอรับ message
  microgear.on(CONNECTED,onConnected);    // ฟังก์ชั่นนี้เป็น event เมื่อเชื่อมต่อ NETPIE สำเร็จ
  microgear.init(KEY,SECRET);
  microgear.connect(APPID);            // ฟังก์ชั่นเชื่อมต่อ NETPIE
}

void loop() {
    if(WiFi.status()!=WL_CONNECTED){
      WiFi.disconnect();                    // ฟังก์ชั่นตัดการเชื่อมต่อ WiFi
      initWiFi();
    } else {
        if (microgear.connected()) {        // ตรวจสอบสถานะการเชื่อมต่อ NETPIE

            if (toPublishSW1State) {            // ตรวจสอบสถานะการอัพเดทสถานะของสวิตซ์ตัวที่ 1
              microgear.publish("/state1",sw1->getState()?"1":"0"); // ตรวจสอบสถานะ และส่งไปที่ topic “/state1”
              toPublishSW1State = false;        // รีเช็ตสถานะคำสั่งสำหรับส่งค่าสวิตซ์ตัวที่ 1
            }

            if (toPublishSW2State) {            // ตรวจสอบสถานะการอัพเดทสถานะของสวิตซ์ตัวที่ 2
              microgear.publish("/state2",sw2->getState()?"1":"0"); // ตรวจสอบสถานะ และส่งไปที่ topic “/state2”

              toPublishSW2State = false;         // รีเช็ตสถานะคำสั่งสำหรับส่งค่าสวิตซ์ตัวที่ 2
            }

            microgear.loop();
        }
        else {
          microgear.connect(APPID);
          delay(500);
        }
    }
}
5.2 คลิกที่แท็บ config.h และแก้ไข config ต่างๆให้ถูกต้อง
#define WIFI_SSID      "{SSID}"            // ชื่อ WiFi
#define WIFI_PASSWORD  "{WIFI_PASSWORD}"    // รหัส WiFi

#define APPID          "{APPID}"        // appid หรือ application id ได้จากการสร้าง application บนเว็บ NETPIE
#define KEY            "{KEY}"        // key ได้จากการสร้าง key ภายใต้ application id สร้างได้บนเว็บ NETPIE (แนะนำใช้เป็น Device Key)
#define SECRET         "{SECRET}"    // secret ได้จากการสร้าง key ภายใต้ application id สร้างได้บนเว็บ NETPIE (แนะนำใช้เป็น Device Key)
#define ALIAS          "{ALIAS}"        // alias เป็นชื่อของอุปกรณ์ จะตั้งชื่ออะไรก็ได้ที่จำได้ (ตัวอย่างนี้ใช้เป็น pieswitch)
5.3 เมื่อแก้ไข config ต่างๆ เรียบร้อย ทำการกด Upload Code ( ดูขั้นตอนการอัพโหลดได้ตามหัวข้อ 4.2-4.4 )
5.4 สร้าง freeboard สำหรับควบคุม PieSwitch ผ่าน NETPIE โดย Login เข้าไปที่เว็บ https://netpie.io และเข้าไปที่เมนู RESOURCES --> FREEBOARDS กดสร้าง Feeboard ที่ปุ่ม +

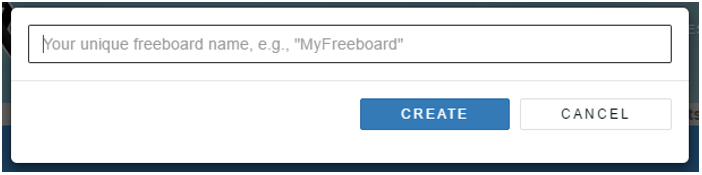
5.5 ตั้งชื่อ Freeboard และไม่ซ้ำกับชื่อ Freeboard ของผู้ใช้งานอื่นๆ และกด CREATE
5.6 หลังจากสร้างเรียบร้อยแล้ว จะมีชื่อ Freeboard เพิ่มขึ้นมา ให้คลิกที่ชื่อ Freeboard ที่ได้สร้างไว้
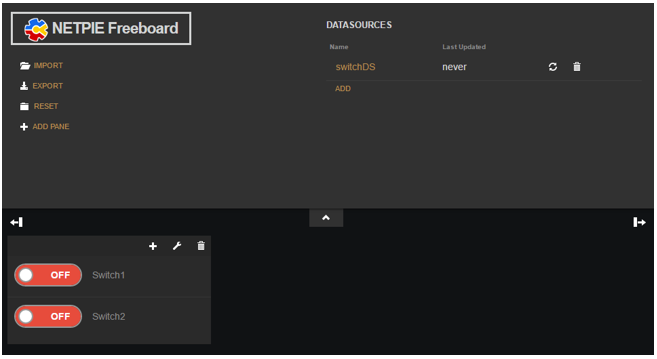
5.7 สร้าง Dashboard ควบคุมบน Freeboard โดยการ Import ไฟล์ json ที่อยู่ใน Folder ชื่อ PieSwitch_Online และเลือกไฟล์ freeboard_config.json จะได้ Dashboard ดังภาพ
5.8 แก้ไข DATASOURCES คลิกที่ datasource name ชื่อ switchDS และแก้ไข APPID, KEY และ SECRET
- {APPID} เป็นชื่อ Application ID (ข้อ 3.2)
- {KEY} และ {SECRET} เป็น key, secret (ข้อ 3.7) แนะนำให้ใช้เป็น Session Key (ขั้นตอนการสร้างข้อ 3.5)

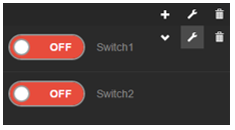
5.9 แก้ไข Widget Toggle โดยนำเมาส์ไปวางบน widget ที่ต้องการแก้ไข จะมีเมนูที่ hidden อยู่ปรากฏขึ้นมา คลิกที่ปุ่ม 
5.10 แก้ไข {APPID} เป็นชื่อ Application ID ที่ได้สร้างไว้
ยกตัวอย่าง Application ID ชื่อ PieSwitch
datasources["switchDS"]["/PieSwitch/state1"]=="1"
การเรียกใช้คำสั่ง microgear สำหรับส่งข้อความหรือข้อมูลใน Freeboard จะต้องอ้างอิงชื่อของ Datasource ที่จะใช้งาน (การเขียนลักษณะนี้ใช้เฉพาะบน NETPIE-Freeboard เท่านั้น)
ตัวอย่าง
microgear["switchDS"].chat("pieswitch","11");

เมื่อแก้ไขเรียบร้อยให้กด SAVE
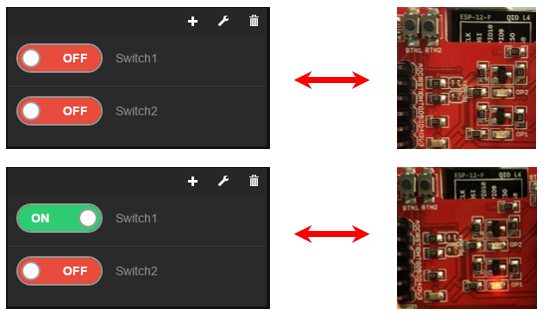
5.11 ทดสอบการทำงานโดยปุ่ม BT1 บน ESP8266 Relay Board และลองคลิกที่ Toggle Switch1 บน Freeboard สถานะไฟ LED และ Toggle จะปรากฏเป็นสถานะเดียวกัน